2016年3月2日 星期三

RUBY ON RAILS TUTORIAL (3RD ED.) Chapter 2 A toy app

1. Now we’re ready to start making the app itself. The typical first step when making a web application is to create a data model, which is a representation of the structures needed by our application.
In our case, the toy app will be a microblog, with only users and short (micro)posts. Thus, we’ll begin with a model for users of the app (Section 2.1.1), and then we’ll add a model for microposts (Section 2.1.2).


2. Rails scaffolding is generated by passing the scaffold command to the rails generate script. The argument of the scaffold command is the singular version of the resource name (in this case, User), together with optional parameters for the data model’s attributes:3


$ rails generate scaffold User name:string email:string


3. (Note that there is no need to include a parameter for id; it is created automatically by Rails for use as the primary key in the database.)

4. To proceed with the toy application, we first need to migrate the database using Rake(Box 2.1):
$ bundle exec rake db:migrate
==  CreateUsers: migrating ====================================================
-- create_table(:users)
   -> 0.0017s
==  CreateUsers: migrated (0.0018s) ===========================================
This simply updates the database with our new users data model. (We’ll learn more about database migrations starting in Section 6.1.1.) 

5. Note that, in order to ensure that the command uses the version of Rake corresponding to our Gemfile, we need to run rake using bundle exec. On many systems, including the cloud IDE, you can omit bundle exec, but it is necessary on some systems, so I’ll include it for completeness.
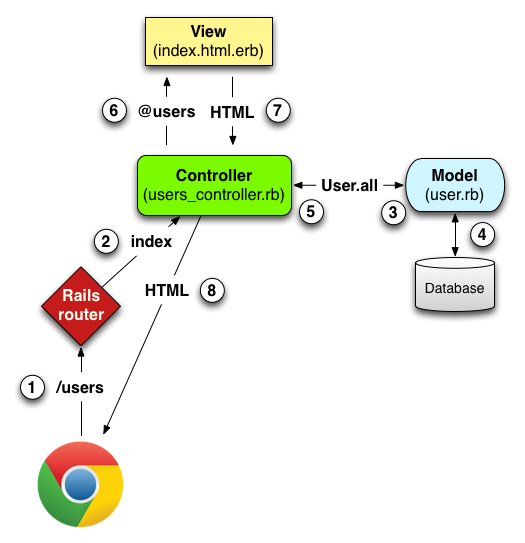

6. 2.2.2 MVC in action

images/figures/mvc_detailed

Here is a summary of the steps shown in Figure 2.11:
  1. The browser issues a request for the /users URL.
  2. Rails routes /users to the index action in the Users controller.
  3. The index action asks the User model to retrieve all users (User.all).
  4. The User model pulls all the users from the database.
  5. The User model returns the list of users to the controller.
  6. The controller captures the users in the @users variable, which is passed to the index view.
  7. The view uses embedded Ruby to render the page as HTML.
  8. The controller passes the HTML back to the browser.5

7. You may notice that there are more actions than there are pages; the index, show, new, and edit actions all correspond to pages from Section 2.2.1, but there are additional create,update, and destroy actions as well. These actions don’t typically render pages (although they can); instead, their main purpose is to modify information about users in the database.

8. Note fromTable 2.2 that there is some overlap in the URLs; for example, both the user show action and the update action correspond to the URL /users/1. The difference between them is the HTTP request method they respond to.

HTTP requestURLActionPurpose
GET/usersindexpage to list all users
GET/users/1showpage to show user with id 1
GET/users/newnewpage to make a new user
POST/userscreatecreate a new user
GET/users/1/editeditpage to edit user with id 1
PATCH/users/1updateupdate user with id 1
DELETE/users/1destroydelete user with id 1
Table 2.2: RESTful routes provided by the Users resource in Listing 2.2.

9. This index action has the line @users = User.all (Step 3 in Figure 2.11), which asks the User model to retrieve a list of all the users from the database (Step 4), and then places them in the variable @users (pronounced “at-users”) (Step 5). The User model itself appears inListing 2.6; although it is rather plain, it comes equipped with a large amount of functionality because of inheritance (Section 2.3.4 and Section 4.4). In particular, by using the Rails library called Active Record, the code in Listing 2.6 arranges for User.all to return all the users in the database.

10. Once the @users variable is defined, the controller calls the view (Step 6), shown inListing 2.7. Variables that start with the @ sign, called instance variables, are automatically available in the views; in this case, the index.html.erb view in Listing 2.7 iterates through the @users list and outputs a line of HTML for each one. (Remember, you aren’t supposed to understand this code right now. It is shown only for purposes of illustration.)


11.

 2.3.3 A user has_many microposts

One of the most powerful features of Rails is the ability to form associations between different data models. In the case of our User model, each user potentially has many microposts. We can express this in code by updating the User and Micropost models as inListing 2.11 and Listing 2.12.
Listing 2.11: A user has many microposts.app/models/user.rb
class User < ActiveRecord::Base
  has_many :microposts
end
Listing 2.12: A micropost belongs to a user.app/models/micropost.rb
class Micropost < ActiveRecord::Base
  belongs_to :user
  validates :content, length: { maximum: 140 }
end
We can visualize the result of this association in Figure 2.15. Because of the user_id column in the microposts table, Rails (using Active Record) can infer the microposts associated with each user.


2015年6月22日 星期一

Association

http://guides.rubyonrails.org/association_basics.html
Active Record Associations

1) 2.4 The has_many :through Association

has_many :through Association Diagram

A has_many :through association is often used to set up a many-to-many connection with another model. This association indicates that the declaring model can be matched with zero or more instances of another model by proceeding through a third model. For example, consider a medical practice where patients make appointments to see physicians. The relevant association declarations could look like this:

兩個model透過第三方的model來進行聯結。


class Physician < ActiveRecord::Base
  has_many :appointments
  has_many :patients, through: :appointments
end
class Appointment < ActiveRecord::Base
  belongs_to :physician
  belongs_to :patient
end
class Patient < ActiveRecord::Base
  has_many :appointments
  has_many :physicians, through: :appointments
end

class Survey < ActiveRecord::Base
  has_many :categories
  has_many :questions, through: :categories
end
class Category < ActiveRecord::Base
  belongs_to :survey
  belongs_to :question
end
class Question < ActiveRecord::Base
  has_many :categories
  has_many :survey, through: :categories
end

The has_many :through association is also useful for setting up "shortcuts" through nested has_many associations. For example, if a document has many sections, and a section has many paragraphs, you may sometimes want to get a simple collection of all paragraphs in the document. You could set that up this way:
:through可以當作捷徑來使用。

class Document < ActiveRecord::Base
  has_many :sections
  has_many :paragraphs, through: :sections
end
class Section < ActiveRecord::Base
  belongs_to :document
  has_many :paragraphs
end
class Paragraph < ActiveRecord::Base
  belongs_to :section
end

class Survey < ActiveRecord::Base
  has_many :categories
  has_many :questions, through: :categories
end
class Category < ActiveRecord::Base
  belongs_to :survey
  has_many :questions
end
class Question < ActiveRecord::Base
  belongs_to :categories
end

With through: :sections specified, Rails will now understand:
@document.paragraphs
@survey.questions

2) 2.8 Choosing Between has_many :through and has_and_belongs_to_many


The simplest rule of thumb is that you should set up a has_many :through relationship if you need to work with the relationship model as an independent entity. If you don't need to do anything with the relationship model, it may be simpler to set up a has_and_belongs_to_many relationship (though you'll need to remember to create the joining table in the database).

You should use has_many :through if you need validations, callbacks, or extra attributes on the join model.

如果需要
validations, 
callbacks, 
or extra attributes的話,
應該要用 has_many :through

ihower:Rails還有一種舊式的has_and_belongs_to_many方法也可以建立多對多關係,不過已經很少使用,在此略過不提。


3) 2.9 Polymorphic Associations

A slightly more advanced twist on associations is the polymorphic association. With polymorphic associations, a model can belong to more than one other model, on a single association. For example, you might have a picture model that belongs to either an employee model or a product model. Here's how this could be declared:

一個model可以屬於一個以上的model


class Picture < ActiveRecord::Base
  belongs_to :imageable, polymorphic: true
end
class Employee < ActiveRecord::Base
  has_many :pictures, as: :imageable
end
class Product < ActiveRecord::Base
  has_many :pictures, as: :imageable
end
You can think of a polymorphic belongs_to declaration as setting up an interface that any other model can use. From an instance of the Employee model, you can retrieve a collection of pictures: @employee.pictures.

interface:介面:其他Model可以使用的介面
可以直接下:
@employee.pictures    @product.pictures.

class questions < ActiveRecord::Base
  belongs_to :category, polymorphic: true
end
class Survey < ActiveRecord::Base
  has_many :questions, as: :category
end
class Category < ActiveRecord::Base
  has_many :questions, as: :category
end

如果以ihower 的範例來看(https://ihower.tw/rails4/activerecord-relationships.html)
我的案子好像不太適合用
polymorphic associations,
我的category應該不太需要更新。

有用的範例:http://www.gotealeaf.com/blog/understanding-polymorphic-associations-in-rails
順便參考一下最下面的:Combining has_many :through and polymorphic association

應用:


一份問卷,有不同的類別,每個類別有許多題目,每個題目有許多選項。


*http://rails101s.logdown.com/posts/211428-active-record-association

代表此變數 ( memebers, participated_groups ) 是經由 ( through ) group_users 這個資料表
來取得 ( user , group ) 資料 
(我以為has_and_belongs_to_many才會有group_users這樣的命名方式,原來has_many :through也可以。)


app/models/user.rb
  has_many :group_users
  has_many :participated_groups, :through => :group_users, :source => :group
end
看用戶回答過哪些問題
has_many :answered_questions, :through => :question_users, :source => :question