In our case, the toy app will be a microblog, with only users and short (micro)posts. Thus, we’ll begin with a model for users of the app (Section 2.1.1), and then we’ll add a model for microposts (Section 2.1.2).
2. Rails scaffolding is generated by passing the scaffold command to the rails generate script. The argument of the scaffold command is the singular version of the resource name (in this case, User), together with optional parameters for the data model’s attributes:3
$ rails generate scaffold User name:string email:string
4. To proceed with the toy application, we first need to migrate the database using Rake(Box 2.1):
This simply updates the database with our new users data model. (We’ll learn more about database migrations starting in Section 6.1.1.)
$ bundle exec rake db:migrate
==  CreateUsers: migrating ====================================================
-- create_table(:users)
   -> 0.0017s
==  CreateUsers: migrated (0.0018s) ===========================================
5. Note that, in order to ensure that the command uses the version of Rake corresponding to our Gemfile, we need to run rake using bundle exec. On many systems, including the cloud IDE, you can omit bundle exec, but it is necessary on some systems, so I’ll include it for completeness.

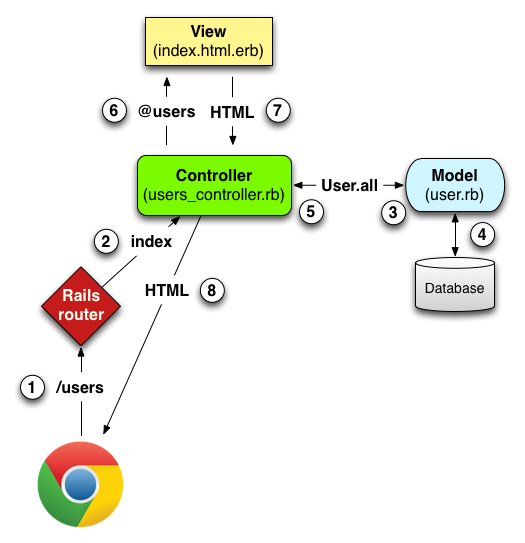
Here is a summary of the steps shown in Figure 2.11:
- The browser issues a request for the /users URL.
- Rails routes /users to the
indexaction in the Users controller. - The
indexaction asks the User model to retrieve all users (User.all). - The User model pulls all the users from the database.
- The User model returns the list of users to the controller.
- The controller captures the users in the
@usersvariable, which is passed to theindexview. - The view uses embedded Ruby to render the page as HTML.
- The controller passes the HTML back to the browser.5
8. Note fromTable 2.2 that there is some overlap in the URLs; for example, both the user show action and the update action correspond to the URL /users/1. The difference between them is the HTTP request method they respond to.
| HTTP request | URL | Action | Purpose |
| GET | /users | index | page to list all users |
| GET | /users/1 | show | page to show user with id 1 |
| GET | /users/new | new | page to make a new user |
| POST | /users | create | create a new user |
| GET | /users/1/edit | edit | page to edit user with id 1 |
| PATCH | /users/1 | update | update user with id 1 |
| DELETE | /users/1 | destroy | delete user with id 1 |
Table 2.2: RESTful routes provided by the Users resource in Listing 2.2.
9. This
10. Once the
index action has the line @users = User.all (Step 3 in Figure 2.11), which asks the User model to retrieve a list of all the users from the database (Step 4), and then places them in the variable @users (pronounced “at-users”) (Step 5). The User model itself appears inListing 2.6; although it is rather plain, it comes equipped with a large amount of functionality because of inheritance (Section 2.3.4 and Section 4.4). In particular, by using the Rails library called Active Record, the code in Listing 2.6 arranges for User.all to return all the users in the database.10. Once the
@users variable is defined, the controller calls the view (Step 6), shown inListing 2.7. Variables that start with the @ sign, called instance variables, are automatically available in the views; in this case, the index.html.erb view in Listing 2.7 iterates through the @users list and outputs a line of HTML for each one. (Remember, you aren’t supposed to understand this code right now. It is shown only for purposes of illustration.)11.
2.3.3 A user has_many microposts
One of the most powerful features of Rails is the ability to form associations between different data models. In the case of our User model, each user potentially has many microposts. We can express this in code by updating the User and Micropost models as inListing 2.11 and Listing 2.12.
Listing 2.11: A user has many microposts.app/models/user.rb
class User < ActiveRecord::Base
  has_many :microposts
end
Listing 2.12: A micropost belongs to a user.app/models/micropost.rb
class Micropost < ActiveRecord::Base
  belongs_to :user
  validates :content, length: { maximum: 140 }
end
We can visualize the result of this association in Figure 2.15. Because of the
user_id column in the microposts table, Rails (using Active Record) can infer the microposts associated with each user.